Feed-to-length is a motion control technique where the processed material (i.e. web, wire) is moved (“feed”) for certain length and processed for each cycle. Furthermore, the exact amount of the feed-length is adjusted based on a real time sensor position measurement to correct for variations in the process, i.e. material may have slipped during the feed. Common applications include food processing, packaging machines, metal processing, forest products and wood processing.
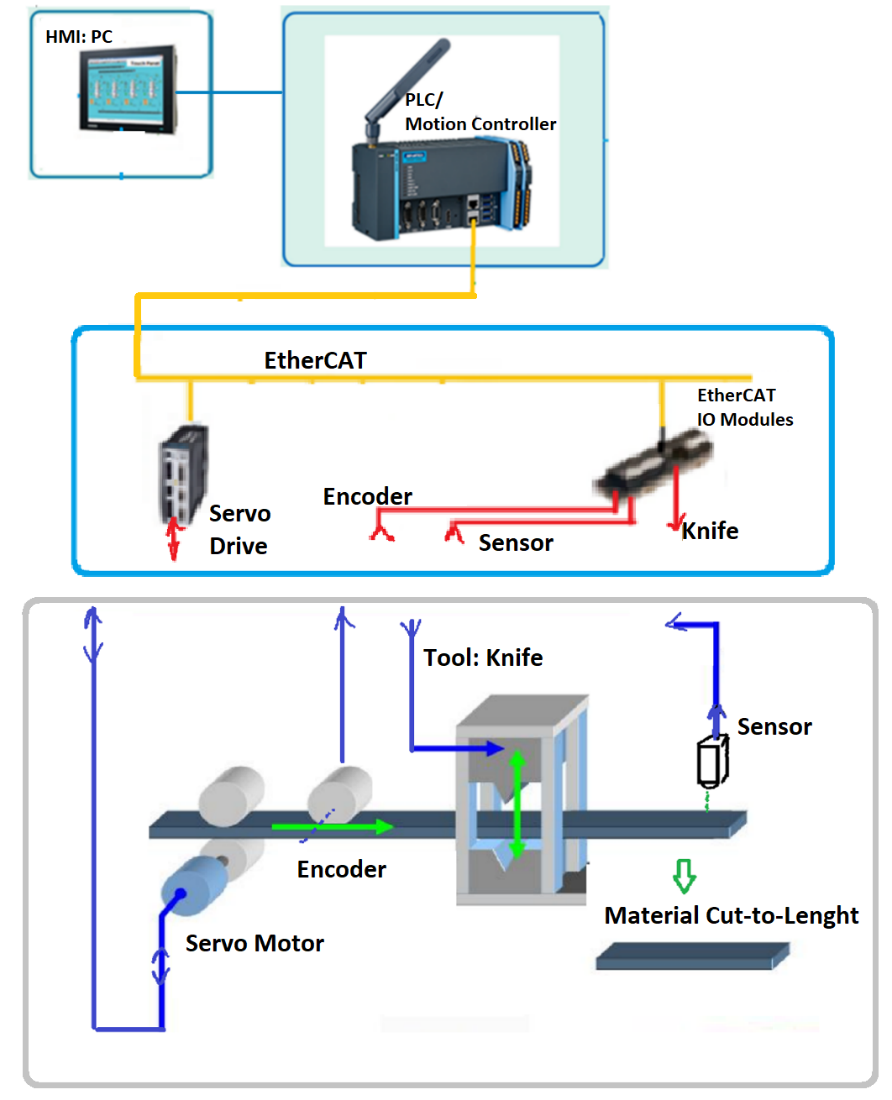
Motion control system for a feed-to-length application involves the following hardware components (as shown in the figure below, Fig. 1)
- HMI
- Motion controller with EtherCAT Slave IO Module for digital I/O
- A servo axis: servo motor and drive
- An ON/OFF relay controlled tool actuator, and
- Photoelectric Sensor
- Master (Pacer) Encoder (optional)

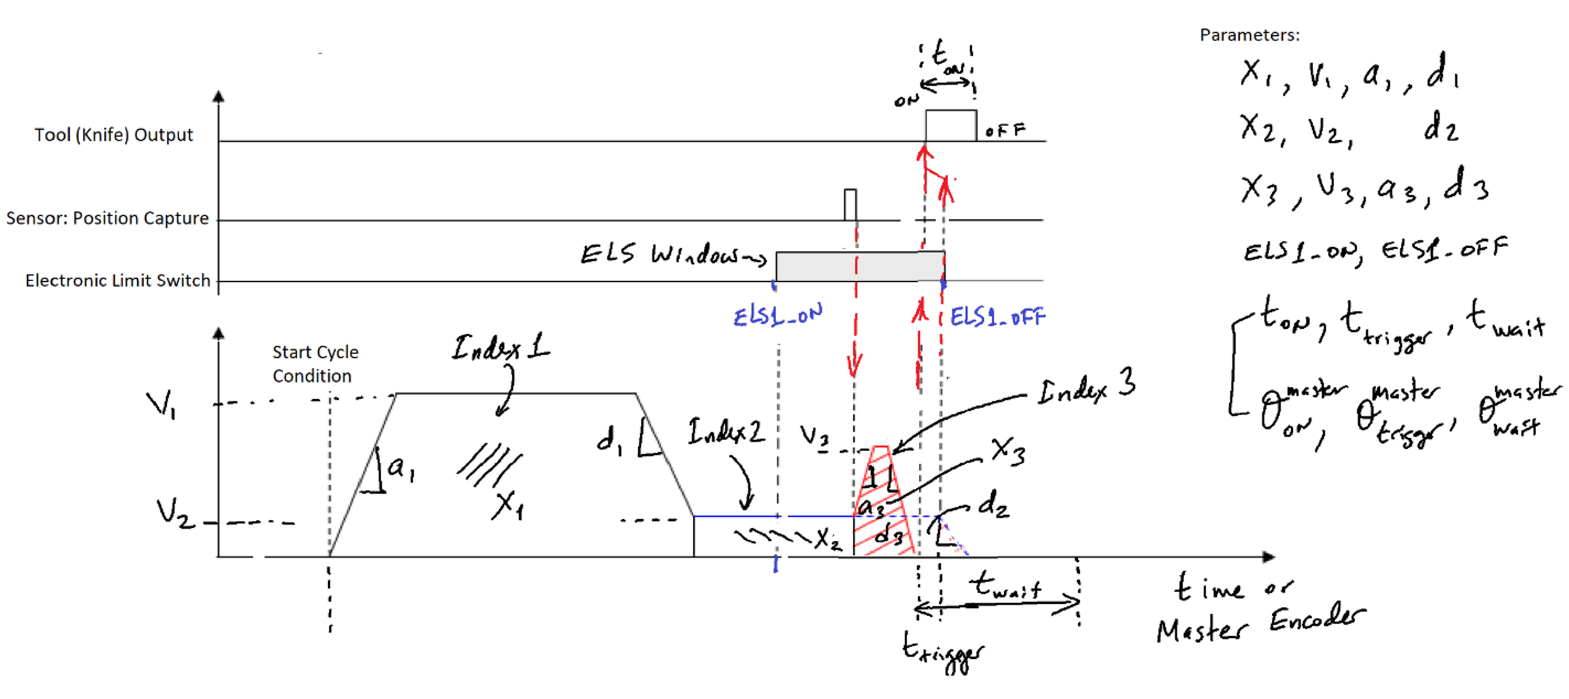
The control logic is as follows (Fig. 2):
1. Begin Cycle: On “START CYCLE” command from HMI or another PLC/Controller, start cycle.
2. Feed the material at high speed for a defined distance: The motion profile is defined with accel rate,
3. Slow down to a lower speed and continue to feed for a set maximum distance: motion profile is defined with top speed and distance parameters.
4. At some position during the slowed down motion, look for a “sensor” , and on that signal either stop at that position or move a defined distance from that position. As a function of the axis position, an “electronic limit switch” function is defined; a window during which a sensor input is enabled to capture the servo position. If the sensor position capture does not occur during that window, the planned maximum distance motion is completed. If the sensor position capture occurs, an additional distance from the captured position is made (note: that additional distance can be zero, which means, material is positioned at the point when the sensor signal turned ON. For zero additional distance, this will require a reverse position motion. If the application does not allow that, the sensor should be positioned so that the additional position is large enough to safely and accurately decelerate to zero speed within that distance. In some applications, sensor does not exits and Index 3 motion is not made, rather only servo motor position based Index 1 and Index 2 is performed.
5. Turn ON output to the tool actuator (i.e. knife controlled by an ON/OFF relay-solenoid-pneumatic system) for a certain period of time.
6. Turn OFF the output to the actuator after that time period. Turn ON and turn OFF time of the tool may be “time-based” relative to the motion state (i.e. 100 msec after servo motion is completed) or it may be based on the servo position (i.e. at the end of Index 2, or at the end of Index 3, or at some position during the Index 2 or Index 3 motion).
7. Repeat Cycle.

In addition to the above auto-cycle logic, the control system has basic Manual Mode functions to Home, Jog, Index the servo motor and operate the ON/OFF actuator manually. In addition, the application has Setup Mode where the motion parameters are defined.
Control algorithm Inputs:
Sensor for position capture
Master Encoder (optional)
Control algorithm Outputs:
Servo Motor/Drive #1
Tool (knife) axis: ON/OFF
Control Algorithm Parameters:
The options are selected in the input channels of the Function Block.
x1, V1, a1 or ta1, d1 or td1 ,
x2, V2, d2 or td2,
x3, V3 , a3 or ta3, d3 or td3
t_on, t_trigger, t_wait or Master_on, Master_trigger, Master_wait
Select “Sensor” exits or not;
if not exists Index 3 is not made and ELS1 function is not used.
ELS1_ON, ELS1_OFF (If “Sensor” is not used, set these to zero)
